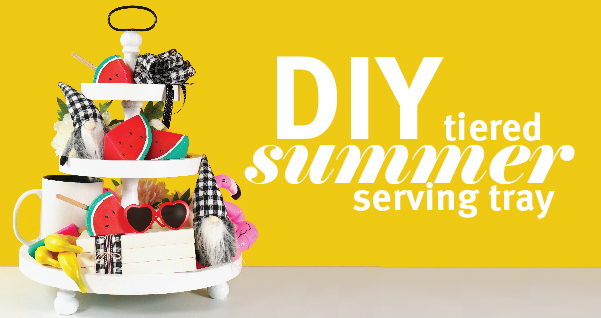
DIY Summer Serving Tiered Trays
Bonus: This project doubles as a jewelry or cosmetics stand, too!
The season of warm weather and summer fun is approaching! It’s time to break out the pool noodles, sunglasses, lemonade, and soak in that vitamin D. Summer parties will soon be in full swing and what better way to add a little pizzazz to your spread than a unique tiered serving tray? If you’re not into hosting, this serving tray can also be used as a jewelry or cosmetic stand! We’ll walk you through this super simple and affordable do-it-yourself project.

- Get the goods. There are SO MANY options at your local VOA Thrift stores. It just depends on the vibe you’re looking for!
The Basics:
+ Two or three plates, cake pans, or small trays. They can be the same size or you can go with a large to small look, just make sure they’re not too heavy.
+ One or two candlesticks, glasses, teacups, or any item with a flat surface on both ends for your center post. (use one if you have two plates, two if you have three plates)
+ E6000 Glue: you can find this on amazon, local craft store, Lowe’s, or Home Depot.
+ Oil-Based Spray Paint: This isn’t required if you pick out items that suit your fancy and you want a more rustic look. But if you want a monotone tray, grab some oil-based spray paint from your local hardware or craft store. - Prepare your space and clean your items. We recommend putting down cardboard, newspaper, or a bedsheet you won’t use anymore if you don’t have a dedicated project workspace.
- Use a ruler or tape measure to mark the centers of your plates with a permanent marker. You can also eyeball this if you’re feeling confident.
- Pro tip: You may not need this step if your center and top plates are sitting level on your center posts, but if they aren't, you can trace a new base onto some cardboard, cut, and then glue to the bottom of your center or top plates. (below)

- Apply the glue to the base of your candlestick or other center post item.
- With your base plate facing up (as if you were eating from it), firmly press the glued end of your post in the center.

- Apply glue to the top of your center post and place your next plate following the center bottom marker. Glue directions say to wait 24 hours to set, but you can start painting after 12 hours or less, depending on the humidity and temperature of your work space.
- Repeat steps 4-7 if you are adding a third tier.
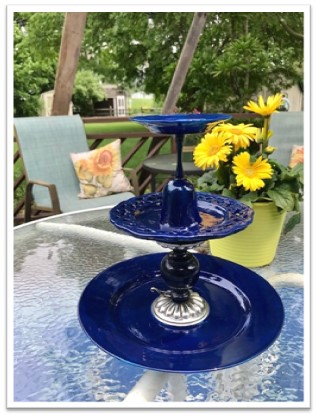
- Let the glue dry before applying spray paint. If there are certain features you’d like to keep as-is, you can use painter’s tape to cover them before painting. We loved the metal details on the bottom tier, so we preserved those from paint.

- Apply your spray paint in a well-ventilated area. The paint we used only took 20 minutes to dry, which makes it easier to add additional coats. These pieces took 3 coats, but it all depends on the look you’re going for!

And voila! Your Summer Serving Tiered Tray (or cosmetic stand!) is good to go!
Care tip: This is an oil-based paint so it shouldn’t come off during washes, but we recommend using a damp towel to wipe off after use vs. submerging in the sink.